


Blog
Discover the latest industry trends and insights related to bathroom architecture and ADA compliance.

TL;DR
Commercial plumbing teams need to resolve the floor, support method, and finished entry before setting a fiberglass shower. Match the unit’s installation instructions to the prepared floor and selected configuration; a factory-reinforced bottom does not correct an uneven substrate.
- Prepare the supporting floor before applying the specified mat or adhesive.
- Check level at the unit’s designated reference surfaces, not its sloping shower floor.
- Confirm drain clearance and threshold details before fastening or closing in the installation.
Fiberglass shower base support should follow the selected model’s installation instructions: prepare a level supporting floor, seat the designated bottom supports, and use the specified setting materials. Confirm alignment before fastening. Start with EverFab’s installation instructions, not a generic shower-pan method.
For the plumbing foreman and general contractor, the key decision is whether the actual floor, drain rough-in, and finished-floor elevation match the approved installation detail. Resolve a mismatch before repeating it across multiple rooms.
Confirm the Model Before Planning the Installation
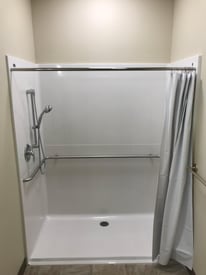
Identify the complete model and threshold configuration, then pair the applicable installation sheet with the model submittal. A standalone shower pan, a one-piece stall, and a multi-piece unit should not automatically share one installation method.
Keep the selected documents in the field package. Record who will correct the floor, verify the drain, and release the area for installation. These responsibilities should follow the project’s assigned scopes, rather than an assumption that the plumbing crew owns every preparation task.
Prepare a Level Supporting Floor
EverFab’s standard shower-pan instructions call for a level floor and plumb walls. They require floor leveling before installation when the floor is more than 1/8 inch out of level. The sheet does not define a per-foot allowance; do not assume one when evaluating the floor.
During preparation, check for debris, local high spots, low areas, and visible damage. Flatness and level are different: a smooth plane can still tilt. Assign damaged or questionable structural conditions to the appropriate project reviewer; the shower’s bottom plate does not establish the building floor’s capacity.
For layout, compare the submittal with the delivered unit. The S6336A-L/R submittal specifically directs installers to measure site-preparation dimensions from the unit. Do not rely solely on a catalog size when locating the opening and drain.
Agree on the floor-correction method before the unit is set. Check compatibility and curing requirements for any preparation product with its manufacturer. After the correction, recheck the dry fit, drain clearance, and entry elevation. Setting adhesive should not become an improvised substitute for the required floor preparation.
Match Fiberglass Shower Base Support to the Bottom Construction
The EverFab Bottom Plate is a one-piece composite reinforcing plate laminated onto the unit’s base. EverFab describes a factory-preleveled plate with multiple floor-contact points. This construction gives installers a defined support arrangement to evaluate alongside the applicable installation sheet.
Factory preparation and field preparation solve different problems. A preleveled plate does not level a sloping slab or remove a high spot beneath it. Inspect how the intended supports meet the prepared floor during the dry fit. Do not assume that every open space under the molded unit requires filling, or that contact at only the perimeter is sufficient.
Treat rocking, unexpected gaps at intended supports, or interference around the drain as conditions to resolve before setting. The plate is a construction feature, not a promise of no cracking or a substitute for the documented support method.
Choose the Specified Mat or Adhesive Method
EverFab’s published sheets show why product-family distinctions matter. The Standard Installation Instructions describe a supplied mat, with construction adhesive as an alternative. By contrast, the Standard Shower Pan Installation Instructions specify adhesive at the front threshold and each rung of the support plate; they do not present that same mat option.
The Barrier-Free Installation Instructions also describe an adhesive-setting procedure. Confirm which sheet applies to the selected unit rather than transferring an option from another product family.
Mortar, a mat, adhesive, and expanding foam are not interchangeable choices. The reviewed sheets do not support a universal mortar requirement or a universal no-mortar promise. Obtain written direction for an unaddressed field condition instead of adding a setting material by habit.
Where the barrier-free adhesive procedure applies, its instructions call for at least 120 pounds of evenly distributed weight during the adhesive manufacturer’s recommended curing period. Follow that seating and curing procedure; do not use weight to force an out-of-level installation into position.
Check Level at the Correct Reference Surfaces
The multi-piece installation instructions call for floor checks in multiple directions and checks of the base’s horizontal and vertical reveals for level and plumb. Use the applicable unit’s reference surfaces. Do not treat its sloping shower floor as a flat leveling surface or tilt the entire unit to create drainage.
Those multi-piece instructions also discuss shimming stud walls to make them plumb. That direction is not a base-shimming detail. For an unsupported bottom contact point, confirm the permitted correction with EverFab rather than assuming wood or plastic shims are acceptable beneath any model.
Coordinate the Drain and Finished Threshold
Dry-fit the drain connection and check its clearance before final setting. For example, page 3 of the S6336A-L/R submittal shows different standard, low-profile, and no-recess threshold details, including their relationships to the subfloor and finished floor. Use the selected configuration, not a generic block-out dimension.
For an accessible installation, review the entry and shower-floor conditions separately from base leveling. The U.S. Access Board’s bathing-room guidance explains Americans with Disabilities Act (ADA) shower and threshold requirements. Final compliance depends on the applicable code, model, accessories, installed condition, and authority having jurisdiction.
Before the installation is concealed, use a short coordination check:
- Confirm the installed model, threshold option, and field dimensions match the approved documents.
- Record the floor correction, intended support contact, and level/plumb checks.
- Verify drain alignment and the planned finished-floor transition without forcing the unit into place.
- Protect the setting area through the specified cure period and complete required project inspections.
Frequently Asked Questions
Does a Fiberglass Shower Base Always Need Mortar?
No single mortar rule applies to every fiberglass base. Use the selected product’s instructions. The EverFab sheets discussed here describe mat or adhesive methods for their respective applications; do not interpret that as permission to omit required support or as a no-mortar promise for every condition.
What Should the Installation Allowance Include?
Build the allowance around the actual scope: floor preparation, handling and access, drain rough-in, specified setting materials, curing protection, fastening, and inspection coordination. Confirm who owns each task. A bottom-plate feature alone is not evidence of a particular labor-hour saving.
Does a Floor-Strength Test Establish a Maximum User Weight?
No. EverFab’s published strength results identify particular tested components and configurations. A test result is not a universal user-weight rating or a substitute for the selected model’s installed-support requirements. Ask for application-specific guidance when loading is a project concern.
What Information Helps Resolve a Rocking Base?
Provide the model and threshold option, the installation sheet being used, floor-level measurements, and photos of the supporting floor, underside contact areas, and drain clearance. Describe when the movement occurs. Pause final setting until the cause and correction are resolved.